
nginx
Nginx是什么?
Nginx (engine x) 是一个高性能的HTTP和反向代理web服务器,同时也提供了IMAP/POP3/SMTP服务。Nginx是由伊戈尔·赛索耶夫为俄罗斯访问量第二的Rambler.ru站点(俄文:Рамблер)开发的,第一个公开版本0.1.0发布于2004年10月4日。其将源代码以类BSD许可证的形式发布,因它的稳定性、丰富的功能集、简单的配置文件和低系统资源的消耗而闻名。2011年6月1日,nginx 1.0.4发布。
Nginx是一款轻量级的Web 服务器/反向代理服务器及电子邮件(IMAP/POP3)代理服务器,在BSD-like 协议下发行。其特点是占有内存少,并发能力强,事实上nginx的并发能力在同类型的网页服务器中表现较好,中国大陆使用nginx网站用户有:百度、京东、新浪、网易、腾讯、淘宝等。
Nginx 是高性能的 HTTP 和反向代理的web服务器,处理高并发能力是十分强大的,能经受高负 载的考验,有报告表明能支持高达 50,000 个并发连接数。
Nginx支持热部署,启动简单,可以做到7*24不间断运行。几个月都不需要重新启动。
正向和反向代理
正向代理
Nginx 不仅可以做反向代理,实现负载均衡。还能用作正向代理来进行上网等功能。 正向代理:如果把局域网外的 Internet 想象成一个巨大的资源库,则局域网中的客户端要访 问 Internet,则需要通过代理服务器来访问,这种代理服务就称为正向代理。
简单一点:通过代理服务器来访问服务器的过程 就叫 正向代理。
需要在客户端配置代理服务器进行指定网站访问
反向代理
反向代理,其实客户端对代理是无感知的,因为客户端不需要任何配置就可以访问。
我们只 需要将请求发送到反向代理服务器,由反向代理服务器去选择目标服务器获取数据后,在返 回给客户端,此时反向代理服务器和目标服务器对外就是一个服务器,暴露的是代理服务器 地址,隐藏了真实服务器 IP 地址。
安装方式
方式一 yum安装
#安装依赖包
yum install -y epel-releas
#yum方式安装
yum install -y nginx方式二编译安装Nginx步骤详解
1,去Nginx官方网站下载源码包并解压
curl -O 或wget 跟下载链接 tar -xf 解压
2,进入nginx解压后的目录执行./configure …
./configure --prefix=/usr/local/nginx --user cali --group cali --with stream --with threads --with-http_ssl_module --with-http_realip_module --with-http_stub_status_module
参数解释: –prefix 用于指定nginx编译安装后的目录 –user 指定用户 –group 指定组 –with stream 启动nginx四层负载均衡(传输层) –with threads 启动进程池模块 –with-http_ssl_module 启动nginx的https服务 –with-http_realip_module 启动realip模块 –with-http_stub_status_module 启动nignx的状态查看模块
其他模块: 日志记录模块ngx_http_log_module 压缩相关选项ngx_http_gzip_module 重定向模块ngx_http_rewrite_module 引用模块ngx_http_referer_module 反向代理模块ngx_http_proxy_module
更多模块详情 请点击此处
注: 直接执行上述的./configure 命令 可能会出错,需要我们手动解决依赖关系,根据提示安装一些依赖包,一般需要安装: yum install pcre-devel gcc openssl-devel -y
3,编译安装 make && make install 安装后可看到指定目录的目录结构
4,启动nginx
先创建一个软链接:ln -s /usr/local/nginx/sbin/nginx /usr/bin/nginx
nginx start 启动nginx
ps aux |grep nginx 查看nginx进程是否启动
加入systemctl管理
vim /usr/lib/systemd/system/nginx.service
[Unit]
Description=nginx - high performance web server
Documentation=http://nginx.org/en/docs/
After=network-online.target remote-fs.target nss-lookup.target
Wants=network-online.target
[Service]
Type=forking
PIDFile=/usr/local/nginx/logs/nginx.pid
#注意文件位置,如果不对 启动不了
ExecStart=/usr/local/nginx/sbin/nginx
#注意启动文件位置
ExecReload=/bin/kill -s HUP $MAINPID
ExecStop=/bin/kill -s TERM $MAINPID
[Install]
WantedBy=multi-user.targetnginx配置文件详解
编译安装:一般为/usr/local/nginx/conf/nginx.conf yum安装:/etc/nginx/conf/nginx.conf

全局块:配置全局的指令,对整个Nginx服务器起作用。
events块:配置与连接相关的指令,如工作进程数和连接超时时间等。
http块:配置HTTP服务器的指令,如监听端口、虚拟主机和HTTP模块等。
server块:配置虚拟主机的指令,可以配置多个server块来支持多个域名或IP地址。
location块:配置URL路径的指令,可以在server块或http块中使用。
#全局块
#user nobody;
worker_processes 1;
- 全局块:配置全局的指令,对整个Nginx服务器起作用。
- events块:配置与连接相关的指令,如工作进程数和连接超时时间等。
- http块:配置HTTP服务器的指令,如监听端口、虚拟主机和HTTP模块等。
- server块:配置虚拟主机的指令,可以配置多个server块来支持多个域名或IP地址。
- location块:配置URL路径的指令,可以在server块或http块中使用。
#event块
events {
worker_connections 1024;
}
#http块
http {
#http全局块
include mime.types;
default_type application/octet-stream;
sendfile on;
keepalive_timeout 65;
#server块
server {
#server全局块
listen 8000;
server_name localhost;
#location块
location / {
root html;
index index.html index.htm;
}
error_page 500 502 503 504 /50x.html;
location = /50x.html {
root html;
}
}
#这边可以有多个server块
server {
...
}
}nginx常用命令
查看Nginx版本号
./nginx -v
启动Nginx
./nginx
关闭Nginx
./nginx -s stop
重新加载Nginx
./nginx -s reload
重启Nginx
./nginx -s reopen
优雅停止Nginx
./nginx -s quit
测试配置文件是否正确
./nginx -t
nginx反向代理
http {
upstream myapp1 {
server srv1.example.com;
server srv2.example.com;
server srv3.example.com;
}
server {
listen 80;
location / {
proxy_pass http://myapp1;
}
}
}
我们知道轮询算法是把请求平均的转发给各个后端,使它们的负载大致相同。
这有个前提,就是每个请求所占用的后端时间要差不多,如果有些请求占用的时间很长,会导致其所在的后端
负载较高。在这种场景下,把请求转发给连接数较少的后端,能够达到更好的负载均衡效果,这就是least_conn算法。
upstream myapp1 {
least_conn;
server srv1.example.com;
server srv2.example.com;
server srv3.example.com;
}
某些场景需要使用ip_hash负载策略,即:同一个ip地址,永远访问nginx后面同一台tomcat
注意事项-!!!
一旦使用了ip_hash,当我们需要移除一台服务器的时候,不能直接删除这个配置项,而是需要在这台服务器配置后面加上关键字down,表示不可用;
因为如果直接移除配置项,会导致hash算法发生更改,后续所有的请求都会发生混乱;
upstream myapp1 {
ip_hash;
server srv1.example.com;
server srv2.example.com;
server srv3.example.com;
}
upstream myapp1 {
server srv1.example.com weight=3; #weight 表示权重,权重越高,被分配到的概率就越大
server srv2.example.com;
server srv3.example.com;
}nginx负载均衡无法加载静态文件
Web服务器经常会使用nginx作前置路由,在使用nginx配置Web服务器负载均衡、动静分离,会碰到设置反向代理后导致前端资源无法加载的问题
nginx反向代理的tomcat服务器导致前端资源css或js加载失败大概可以分为:端口丢失、真实ip或端口获取错误、js或者css太大加载失败等情形
解决:
location / {
proxy_pass http://server_lb;
proxy_set_header Host $host;
proxy_set_header X-Real-IP $remote_addr;
proxy_set_header REMOTE-HOST $remote_addr;
proxy_set_header X-Forwarded-For $proxy_add_x_forwarded_for;
}
nginx动静分离
概述:将所有请求(静态 + 动态)发送给Nginx,Nginx再将动态请求发给网关,而静态资源(静态请求)直接从Nginx中获取;可以提高网站性能
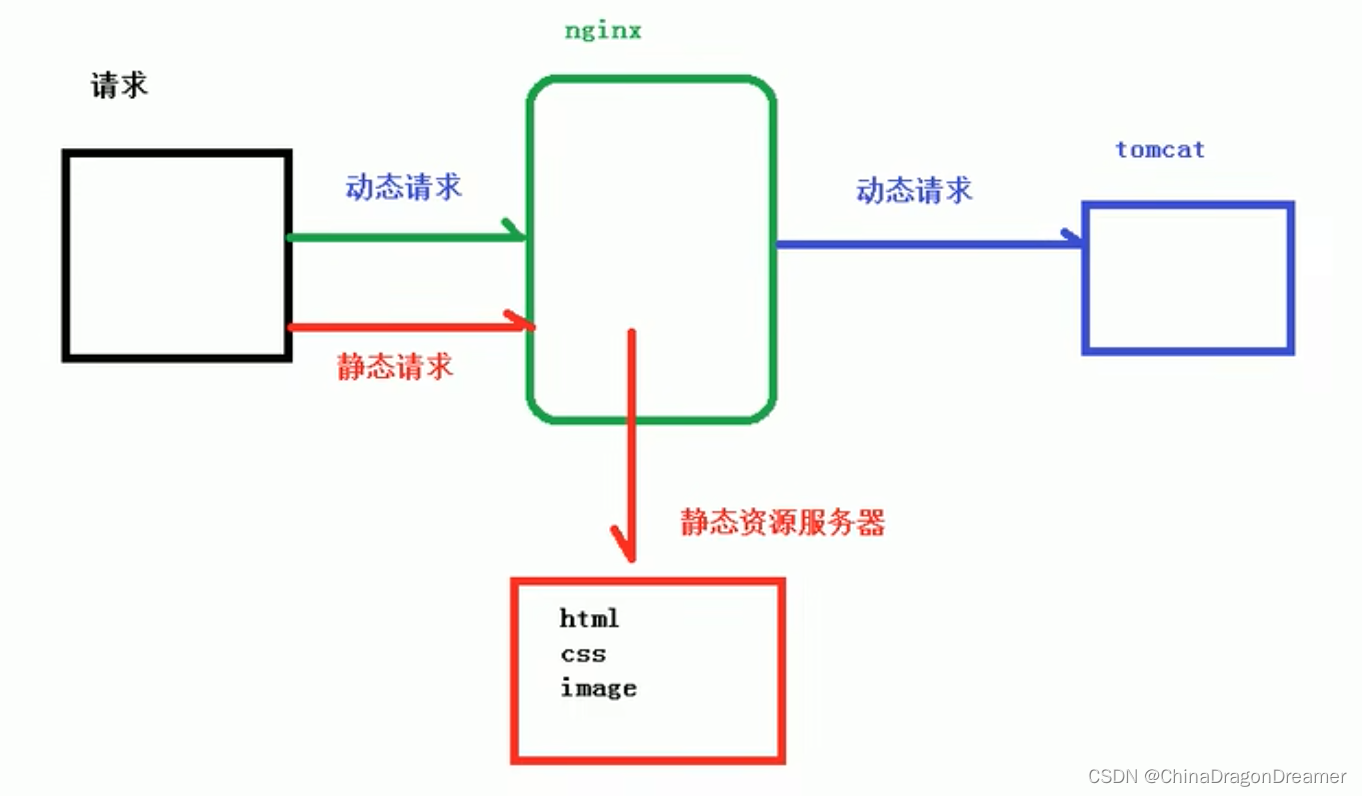
为了提高网站的响应速度,减轻程序服务器(Tomcat,Jboss等)的负载,对于静态资源,如图片、js、css等文件,可以在反向代理服务器中进行缓存,这样浏览器在请求一个静态资源时,代理服务器就可以直接处理,而不用将请求转发给后端服务器。对于用户请求的动态文件,如servlet、jsp,则转发给Tomcat,Jboss服务器处理,这就是动静分离。即动态文件与静态文件的分离。
Nginx实现动静分离的优势
Nginx 服务器:
首页使用精准匹配
静态页面使用正则匹配自己处理
动态页面使用正则匹配jsp结尾的请求,使用proxy_pass转发给Tomcat服务器
Nginx 静态处理优势
Nginx处理静态页面的效率远高于Tomcat的处理能力
若Tomcat的请求量为1000次,则Nginx的请求量为6000次
Tomcat每秒的吞吐量为0.6M,Nginx的每秒吞吐量为3 .6M
Nginx处理静态资源的能力是Tomcat处理的6倍
简述Nginx动静分离原理:
服务端接收来自客户端的请求中,既有静态资源也有动态资源
静态资源有Nginx提供服务
动态资源Nginx转发至后端
Nginx location匹配符与匹配优先级
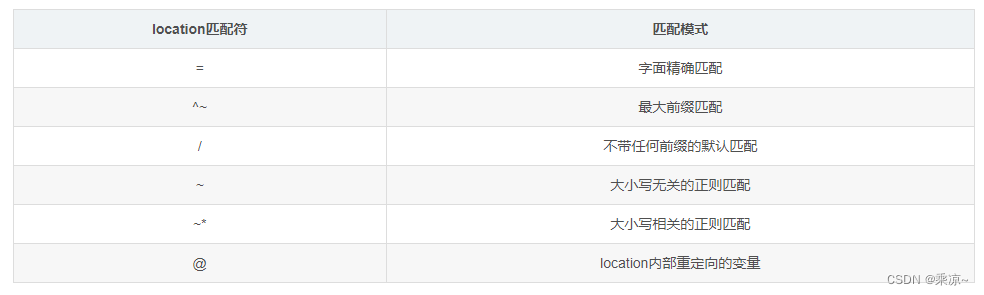
尽管Nginx的配置文件中location的配置有先后顺序,但是Nginx在运行过程中对location模块的查找却并不是按照在配置文件中的位置进行的,而是有一定的匹配规则。 字面精确匹配会第一个被处理,接下来是最大前缀匹配的完整路径,再然后是两个正则匹配,其次是最大前缀的部分路径匹配,最后是不带任何前缀的默认匹配。总得来看,Nginx的location匹配顺序如下所示: 1、location = 2、location ^~(完整路径) 3、location ~或location ~*正则表达式匹配 4、location ^~(部分路径) 5、location / 当location按照顺序匹配到前一个时,就不会继续向下进行匹配。
实现:
#拦截静态资源
location ~.*\.(html|htm|gif|jpg|jpeg|bmp|png|ico|js|css)$ {
root static;
expires 3d;
}
或者
mkdir -pv /static/jpg 存放.jpg图片
mkdir -pv /static/svg 存放.svg图片
upstream gts {
        server 114.115.203.144:8080     weight=1;
        server 192.168.10.11:8080       weight=1;
}
server {
    listen 83;
    location / {
        root html;
        index index.html index.htm;
        proxy_pass      http://gts;
        proxy_set_header Host $host;
    }
      location ~*/(svg|htm|gif|jpg|jpeg|bmp|png|ico|js|css) {
        root /static;
       }

 }
#上面的 root html表示存储静态资源的目录,所有的静态资源全部放在那里,这里html 是nginx 的根目 录下方。 #html|htm|gif|jpg|jpeg|bmp|png|ico|js|css则表示被定义的静态资源 #expires 3d表示定义用户浏览器缓存的时间为3天,如果静态页面不常更新,可以设置更长。这样可以节省 带宽和缓解服务器端压力
nginx平滑升级
一般有两种情况下需要升级Nginx,一种是确实要升级Nginx的版本,另一种是要为Nginx添加新的模块。
因 nginx发现漏洞、需 Nginx 的版本进行更新,需要用到Nginx服务器提供的平滑升级功能。本文仅做备忘功能。
一、查看已安装的 Nginx 版本信息,configure 配置信息
## nginx 目录
/usr/local/nginx/sbin/nginx -V
ps:上一步操作需要得到旧版本nginx的configure配置信息
如图所示,得到 configure 的配置信息。

二、下载当前最新版本 nginx-1.23.2,并通过Xftp上传至服务器,然后执行解压命令。
Nginx 最新下载地址:https://nginx.org/en/download.html
tar -zxvf nginx-1.23.2.tar.gz
1
三、对新版 nginx 进行配置。
注意:有些人可能有疑惑,新下载的nginx在执行./configure的时候--prefix指定的目录是需要指向旧的nginx所指向的prefix目录还是随便指向一个就行,答案是需要指向旧版本的nginx的安装目录
### 参数与老版本参数保持一致
cd nginx-1.23.2
./configure  --prefix=/usr/local/nginx --with-http_ssl_module
四、进行 make 编译
make 切记千万不要输入 make install ps: 可能会导致旧版本文件和参数信息被覆盖!!!!!!!!
切记千万不要输入 make install
切记千万不要输入 make install
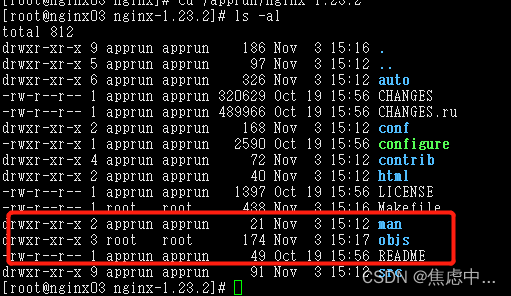
最新版本nginx的目录下会多出来一个objs目录,里面是新的 Nginx二进制文件,make install 的作用就是将二进制文件拷贝到指定的目录。
五、对老版本 sbin 目录下的 nginx 进行备份:
mv /usr/local/nginx/sbin/nginx /usr/local/nginx/sbin/nginx_$(date +%F)六、将步骤四中编译好的 objs 目录下的 nginx 二进制文件,复制到 /usr/local/nginx/sbin 目录。
cp /apprun/nginx-1.23.2/objs/nginx /usr/local/nginx/sbin/nginx七、make upgrade 命令升级
make upgrade
#查看版本
./nginx -VPS: 不用make upgrade 命令升级可以采用服务信号升级 ,服务信号升级方案不做阐述。原理基本与upgrade方案一致,可以查看步骤七中 执行make upgrade 命令的标准输出中,也是通过执行以下服务信号命令进行的相关升级操作。
## 测试Nginx配置是否正确
/usr/local/nginx/sbin/nginx -t
##向主进程(master)发送USR2信号,Nginx会启动一个新版本的master进程和对应工作进程,和旧版一起处理请求
kill -USR2 `cat /usr/local/nginx/logs/nginx.pid
### 检查 Nginx 的Old版本的进程文件是否存在
test -f /usr/local/nginx/logs/nginx.pid.oldbin
##平滑关闭旧master的worker进程
kill -WINCH `cat /usr/local/nginx/logs/nginx.pid.oldbin`
##向旧的Nginx主进程(master)发送(QUIT、TERM、或者KILL)信号,使旧的主进程退出
kill -QUIT `cat /usr/local/nginx/logs/nginx.pid.oldbin`
12345678
八 、检查升级后的版本
/usr/local/nginx/sbin/nginx -VNginx 平滑回退
(1)替换nginx二进制文件
查看
[root@www logs]# cd /usr/local/sbin
[root@www sbin]# ls
nginx  nginx_1.22.0  php-fpm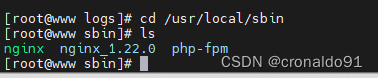
替换
[root@www sbin]# mv nginx nginx_1.25.4
[root@www sbin]# ls
nginx_1.22.0  nginx_1.25.4  php-fpm
[root@www sbin]# mv nginx_1.22.0 nginx
[root@www sbin]# ls
nginx  nginx_1.25.4  php-fpm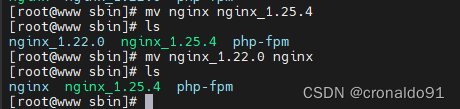
(2)向旧的master发送USR2信号
查看PID
[root@www logs]# cat /usr/local/nginx/logs/nginx.pid
12211
[root@www logs]# kill -USR2 `cat /usr/local/nginx/logs/nginx.pid `
查看进程
[root@www logs]# ps -ef | grep  -E "CMD|nginx"
UID         PID   PPID  C STIME TTY          TIME CMD
root      12211      1  0 14:32 ?        00:00:00 nginx: master process /usr/local/nginx/sbin/nginx
nginx     12212  12211  0 14:32 ?        00:00:00 nginx: worker process
nginx     12213  12211  0 14:32 ?        00:00:00 nginx: worker process
nginx     12214  12211  0 14:32 ?        00:00:00 nginx: worker process
nginx     12215  12211  0 14:32 ?        00:00:00 nginx: worker process
nginx     12216  12211  0 14:32 ?        00:00:00 nginx: worker process
nginx     12217  12211  0 14:32 ?        00:00:00 nginx: worker process
nginx     12218  12211  0 14:32 ?        00:00:00 nginx: worker process
nginx     12219  12211  0 14:32 ?        00:00:00 nginx: worker process
root      14055  12211  0 15:02 ?        00:00:00 nginx: master process /usr/local/nginx/sbin/nginx
nginx     14056  14055  0 15:02 ?        00:00:00 nginx: worker process
nginx     14057  14055  0 15:02 ?        00:00:00 nginx: worker process
nginx     14058  14055  0 15:02 ?        00:00:00 nginx: worker process
nginx     14059  14055  0 15:02 ?        00:00:00 nginx: worker process
nginx     14060  14055  0 15:02 ?        00:00:00 nginx: worker process
nginx     14061  14055  0 15:02 ?        00:00:00 nginx: worker process
nginx     14062  14055  0 15:02 ?        00:00:00 nginx: worker process
nginx     14063  14055  0 15:02 ?        00:00:00 nginx: worker process
root      14077   3006  0 15:02 pts/1    00:00:00 grep --color=auto -E CMD|nginx
[root@www logs]# ps axuw | head -1;ps axuw | grep nginx
USER        PID %CPU %MEM    VSZ   RSS TTY      STAT START   TIME COMMAND
root      12211  0.0  0.0  20536  1692 ?        S    14:32   0:00 nginx: master process /usr/local/nginx/sbin/nginx
nginx     12212  0.0  0.1  24296  2968 ?        S    14:32   0:00 nginx: worker process
nginx     12213  0.0  0.1  24296  2712 ?        S    14:32   0:00 nginx: worker process
nginx     12214  0.0  0.1  24296  2712 ?        S    14:32   0:00 nginx: worker process
nginx     12215  0.0  0.1  24296  2712 ?        S    14:32   0:00 nginx: worker process
nginx     12216  0.0  0.1  24296  2712 ?        S    14:32   0:00 nginx: worker process
nginx     12217  0.0  0.1  24296  2712 ?        S    14:32   0:00 nginx: worker process
nginx     12218  0.0  0.1  24296  2712 ?        S    14:32   0:00 nginx: worker process
nginx     12219  0.0  0.1  24296  2452 ?        S    14:32   0:00 nginx: worker process
root      14055  0.0  0.0  20536  1696 ?        S    15:02   0:00 nginx: master process /usr/local/nginx/sbin/nginx
nginx     14056  0.0  0.1  24296  2716 ?        S    15:02   0:00 nginx: worker process
nginx     14057  0.0  0.1  24296  2716 ?        S    15:02   0:00 nginx: worker process
nginx     14058  0.0  0.1  24296  2716 ?        S    15:02   0:00 nginx: worker process
nginx     14059  0.0  0.1  24296  2716 ?        S    15:02   0:00 nginx: worker process
nginx     14060  0.0  0.1  24296  2716 ?        S    15:02   0:00 nginx: worker process
nginx     14061  0.0  0.1  24296  2716 ?        S    15:02   0:00 nginx: worker process
nginx     14062  0.0  0.1  24296  2716 ?        S    15:02   0:00 nginx: worker process
nginx     14063  0.0  0.1  24296  2456 ?        S    15:02   0:00 nginx: worker process
root      14087  0.0  0.0 112676   984 pts/1    R+   15:03   0:00 grep --color=auto nginx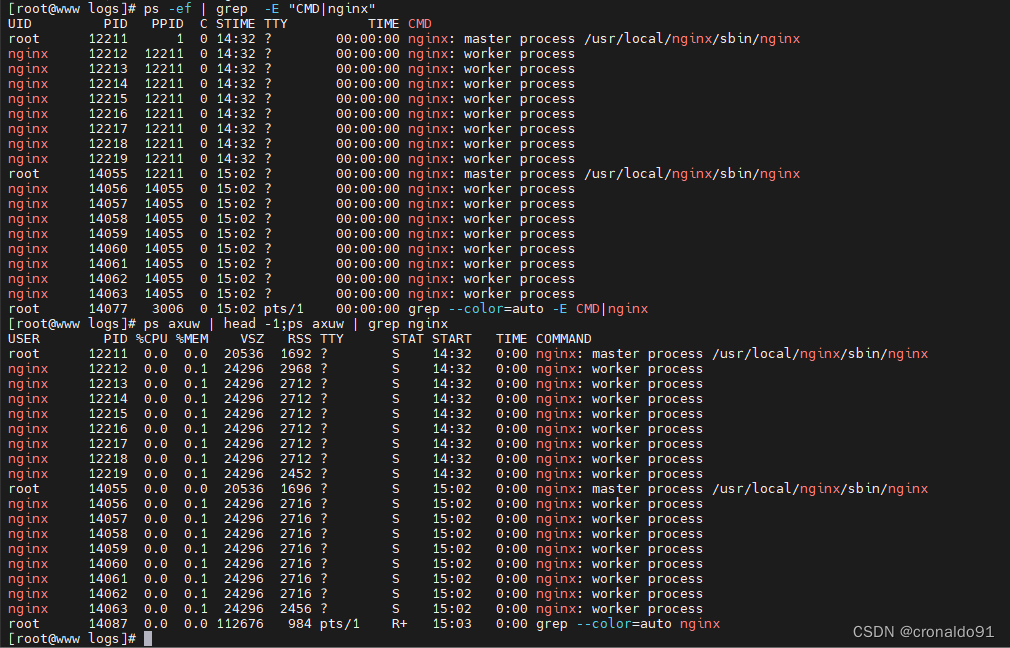
nginx会将老的pid文件命名为nginx.pid.oldbin。
[root@www logs]# ll | head -1 ;ll |grep nginx.pid
总用量 5908
-rw-r--r--. 1 root  root       6 3月  19 15:02 nginx.pid
-rw-r--r--. 1 root  root       6 3月  19 14:32 nginx.pid.oldbin
查看PID
[root@www logs]# cat nginx.pid
14055
[root@www logs]# cat nginx.pid.oldbin
12211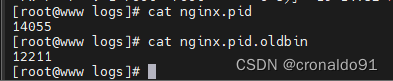
(3)向旧的master发送WINCH信号
[root@www logs]# kill -WINCH `cat /usr/local/nginx/logs/nginx.pid.oldbin`
查看进程
[root@www logs]# ps -ef | grep  -E "CMD|nginx"
UID         PID   PPID  C STIME TTY          TIME CMD
root      12211      1  0 14:32 ?        00:00:00 nginx: master process /usr/local/nginx/sbin/nginx
root      14055  12211  0 15:02 ?        00:00:00 nginx: master process /usr/local/nginx/sbin/nginx
nginx     14056  14055  0 15:02 ?        00:00:00 nginx: worker process
nginx     14057  14055  0 15:02 ?        00:00:00 nginx: worker process
nginx     14058  14055  0 15:02 ?        00:00:00 nginx: worker process
nginx     14059  14055  0 15:02 ?        00:00:00 nginx: worker process
nginx     14060  14055  0 15:02 ?        00:00:00 nginx: worker process
nginx     14061  14055  0 15:02 ?        00:00:00 nginx: worker process
nginx     14062  14055  0 15:02 ?        00:00:00 nginx: worker process
nginx     14063  14055  0 15:02 ?        00:00:00 nginx: worker process
root      14290   3006  0 15:06 pts/1    00:00:00 grep --color=auto -E CMD|nginx
[root@www logs]# ps axuw | head -1;ps axuw | grep nginx
USER        PID %CPU %MEM    VSZ   RSS TTY      STAT START   TIME COMMAND
root      12211  0.0  0.0  20536  1692 ?        S    14:32   0:00 nginx: master process /usr/local/nginx/sbin/nginx
root      14055  0.0  0.0  20536  1696 ?        S    15:02   0:00 nginx: master process /usr/local/nginx/sbin/nginx
nginx     14056  0.0  0.1  24296  2716 ?        S    15:02   0:00 nginx: worker process
nginx     14057  0.0  0.1  24296  2716 ?        S    15:02   0:00 nginx: worker process
nginx     14058  0.0  0.1  24296  2716 ?        S    15:02   0:00 nginx: worker process
nginx     14059  0.0  0.1  24296  2716 ?        S    15:02   0:00 nginx: worker process
nginx     14060  0.0  0.1  24296  2716 ?        S    15:02   0:00 nginx: worker process
nginx     14061  0.0  0.1  24296  2716 ?        S    15:02   0:00 nginx: worker process
nginx     14062  0.0  0.1  24296  2716 ?        S    15:02   0:00 nginx: worker process
nginx     14063  0.0  0.1  24296  2456 ?        S    15:02   0:00 nginx: worker process
root      14305  0.0  0.0 112676   984 pts/1    R+   15:06   0:00 grep --color=auto nginx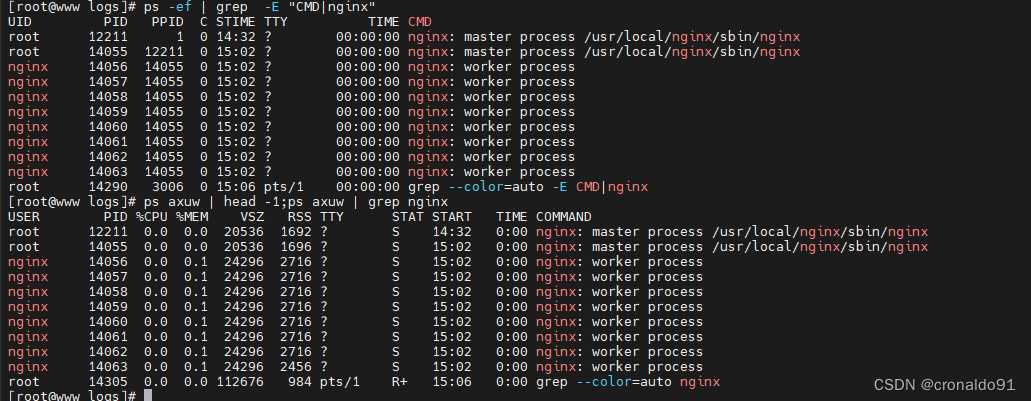
(4)向旧的master发送QUIT信号
[root@www logs]# kill -QUIT `cat /usr/local/nginx/logs/nginx.pid.oldbin`
查看进程
[root@www logs]# ps -ef | grep  -E "CMD|nginx"
UID         PID   PPID  C STIME TTY          TIME CMD
root      14055      1  0 15:02 ?        00:00:00 nginx: master process /usr/local/nginx/sbin/nginx
nginx     14056  14055  0 15:02 ?        00:00:00 nginx: worker process
nginx     14057  14055  0 15:02 ?        00:00:00 nginx: worker process
nginx     14058  14055  0 15:02 ?        00:00:00 nginx: worker process
nginx     14059  14055  0 15:02 ?        00:00:00 nginx: worker process
nginx     14060  14055  0 15:02 ?        00:00:00 nginx: worker process
nginx     14061  14055  0 15:02 ?        00:00:00 nginx: worker process
nginx     14062  14055  0 15:02 ?        00:00:00 nginx: worker process
nginx     14063  14055  0 15:02 ?        00:00:00 nginx: worker process
root      14371   3006  0 15:07 pts/1    00:00:00 grep --color=auto -E CMD|nginx
[root@www logs]# ps axuw | head -1;ps axuw | grep nginx
USER        PID %CPU %MEM    VSZ   RSS TTY      STAT START   TIME COMMAND
root      14055  0.0  0.0  20536  1696 ?        S    15:02   0:00 nginx: master process /usr/local/nginx/sbin/nginx
nginx     14056  0.0  0.1  24296  2716 ?        S    15:02   0:00 nginx: worker process
nginx     14057  0.0  0.1  24296  2716 ?        S    15:02   0:00 nginx: worker process
nginx     14058  0.0  0.1  24296  2716 ?        S    15:02   0:00 nginx: worker process
nginx     14059  0.0  0.1  24296  2716 ?        S    15:02   0:00 nginx: worker process
nginx     14060  0.0  0.1  24296  2716 ?        S    15:02   0:00 nginx: worker process
nginx     14061  0.0  0.1  24296  2716 ?        S    15:02   0:00 nginx: worker process
nginx     14062  0.0  0.1  24296  2716 ?        S    15:02   0:00 nginx: worker process
nginx     14063  0.0  0.1  24296  2456 ?        S    15:02   0:00 nginx: worker process
root      14377  0.0  0.0 112676   984 pts/1    R+   15:07   0:00 grep --color=auto nginx
(5)验证
已恢复之前版本
[root@www logs]# nginx -V
nginx version: IIS777
built by gcc 4.8.5 20150623 (Red Hat 4.8.5-44) (GCC)
configure arguments: --prefix=/usr/local/nginx --user=nginx --group=nginx --with-http_stub_status_module
nginx版本隐藏
Nginx关闭显示版本号
关闭响应报文的Server首部显示nginx版本
在nginx.conf配置文件中的http字段添加
server_tokens off;